Configure
the
LINKSYS NSLU-2 NAS for use with Open PS2 Loader
By jimmikaelkael
By jimmikaelkael
(SlugOS) and configure it properly. This turns the NSLU-2 into a powerful Linux driven mini-NAS.
More information on the NSLU-2 can be found here:
http://www.linksysbycisco.com/US/en/products/NSLU2
http://en.wikipedia.org/wiki/NSLU2
http://www.nslu2-linux.org/
This guide has 10 steps to configure your NAS:
- Configure the LINKSYS NSLU-2 IP settings.
- Flashing SlugOS/BE 5.3 Firmware to the NAS.
- Connecting to the NAS using Putty SSH client.
- Create Partitions on USB thumb drive.
- Format the new Partitions.
- Move the root filesystem to USB thumb drive.
- Install the Standard Package Set.
- Connecting the external USB HDD.
- Install the Samba Server.
- Reconfigure IP settings for using NAS directly hooked up to PS2.
Required parts:
- 1 LinkSys NAS – NSLU2,
- 1 USB Flash Drive (256 MB min. to hold the OS),
- 1 cross-over Ethernet cable,
- 1 Internet router,
- 1 external USB HDD, FAT formatted preferably with games already installed in USBADV format to be able to test,
- 1 power-adaptor for the USB HDD as they often require 2 USB ports and we'll use one to hold the OS.
Note: You must be
aware that once SlugOS/BE firmware has been installed, you can no
longer reach the LinkSys
administration panel.
1/
Configure the LinkSys NSLU2 IP settings:If the NAS is new then follow the furnished Quick Installation manual instructions, you can configure
the NAS directly attached to the PC but in this case make sure to use a cross-over cable. In IP settings
make sure to set something on the same subnet than your PC.
Once configured, you should be able to access the Administration Panel with IE address bar by typing
http://192.168.0.4 (if you configured the LinkSys with this IP) , if it ask you a couple login/password
use “admin” for the two.
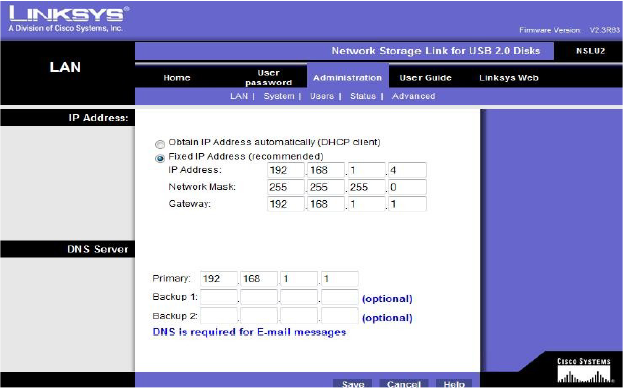
Next, we want that the LinkSys can access to the internet, so go to the Administration Panel, and
configure it so that your Internet router will detect and connect it.
A short example, my Internet router has IP 192.168.1.1 so I configured the LinkSys IP settings like that
(don’t forget to configure primary DNS at the bottom, or the NAS will be unable to resolve DNS):
Click on save and wait a few seconds, it will save settings but should fail to redirect you on a valid
page since you changed IP settings.
Now you can connect the LinkSys to the Internet router with the cross-over cable, then Type
http://192.168.1.4 in IE address bar, the LinkSys Administration Panel should appear, if not stop here
and try to understand why it fails, in case you totally lose the ability to open Administration Panel,
use the CD-ROM.
Go to “System” panel and change the server name to “LINKSYS_NAS”.
2/ Flashing SlugOS/BE 5.3 Firmware to the NAS:
Download the SlungOS/BE 5.3 Firmware binaries:
http://www.slug-firmware.net/s-dls.php, then
download the Sercomm Firmware Updater Util: http://www.everbesthk.com/8-download/sercomm/firmware/NU54/Upgrade_207_XP.zip
You’ll need a SSH client so you can download Putty here:
http://www.chiark.greenend.org.uk/~sgtatham/putty/download.html
Install the Sercomm Upgrade Utility, and once installed set the main .exe of this app to run in
Windows XP SP2 compatibility mode if you’re under Windows Vista.
Shutdown the LinkSys NAS, unplug all USB devices attached to it.
Power on the NAS in Upgrade mode: hold the “reset” button at the rear of the LinkSys, and while
holding it, power on the NAS. As soon as the Ready/Status Led is flashing Red, quickly release the
reset button. If you’re successfully in upgrade mode then the Ready/Status Led will flash from Red to
Green. Do not continue if you fail to enter upgrade mode !
Run the Sercomm Upgrade Util with Administrator Privileges (or it will fail to run or gives strange
error messages), and when it ask select your network device used to access the NAS.
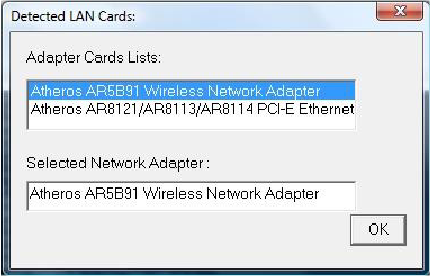
Click “Browse Targets”, and select your device in the list, only 1 should appear with numbers in its
name.
Click “Files”, and select the .bin file from the SlugOS/BE 5.3 release , click OK, then click Upgrade.

Be patient, it takes 5-10 minutes, then a message box should appear saying “Upgrade successfully”
then the NAS should reboot itself after the upgrade and beep 3 times.
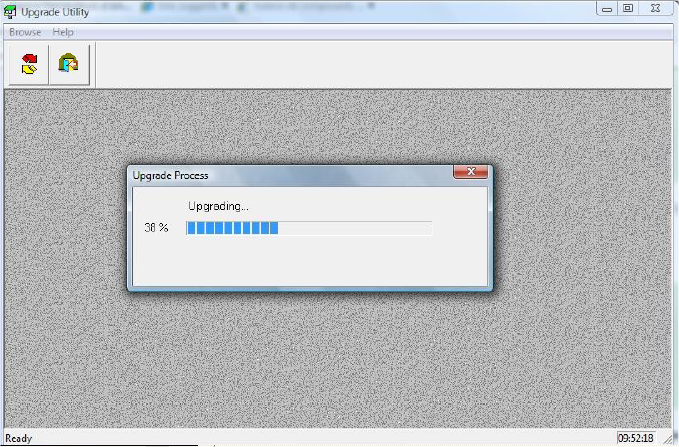
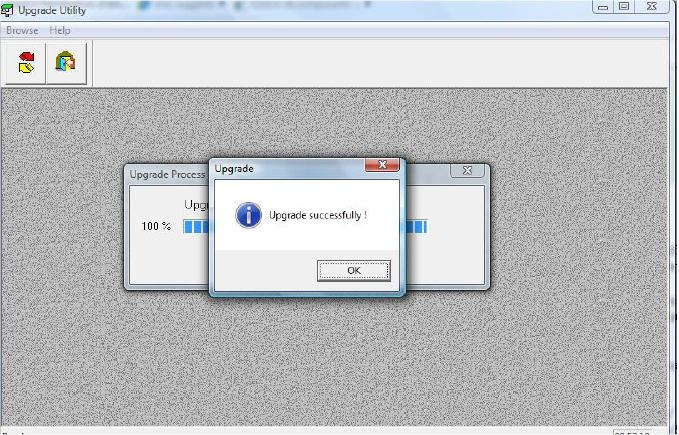
The SlugOS/BE 5.3 firmware flash is done.
3/ Connecting to the NAS using a SSH client (Putty):
Do not plug the USB Flash drive now!!! We want first gain SSH access to the NAS.
Launch the Putty software and just type the IP address you configured for the NAS, then click Open.
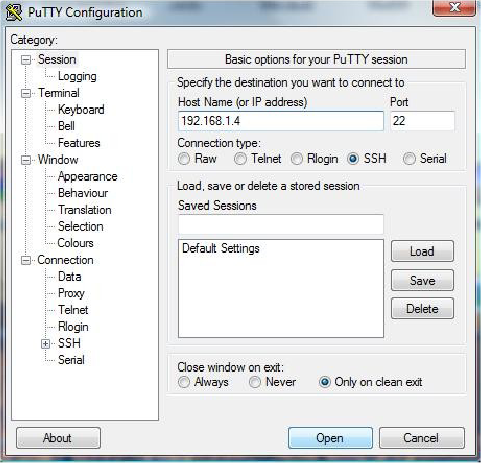
Putty should warn you about a potential security breach, click Yes.
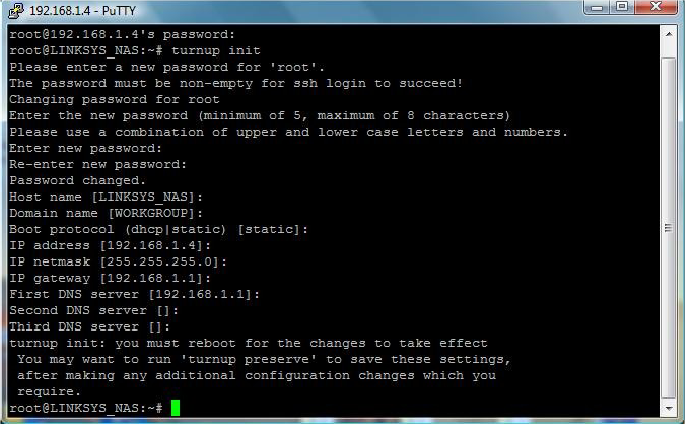
You are prompted for login: “root” password: “opeNSLUg”, you should be logged in.
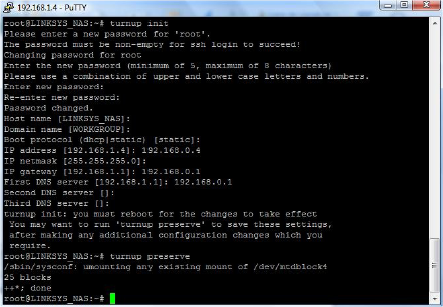
First we will change the password, type “turnup init”, enter “LinkSys” or whatever you want as root
password, let other settings as they are if it’s correct (just press enter to keep old setting, but make
sure that host name is “LINKSYS_NAS”, domain name is “WORKGROUP” and boot protocol is “static”),
you should have the following at screen:
We need to save the changes, type “turnup preserve”.
Plug the USB Flash drive into LinkSys Disk 1 Port, wait a few seconds.
4/ Create partitions on USB stick:
Be aware that what I explain in this section is with a 2 GB USB Flash device, if you’re using another
size the cylinder values will not be the same… The goel being to create 2 parttions:
- 1 EXT3 partition
- 1 Linux Swap partition around 120 MB
Type “fdisk /dev/sda”.
We first want to delete all existing partitions, so first list existing partitions with “p” command.
Then type “d” command to delete partitions one by one, it will just ask you for their number.
Once done retype “p” to see if there’s no partition remaining, if it’s OK then type “w” command to
save the partition table.
Now we’ll create the 2 partitions we need, retype “fdisk /dev/sda”, when prompted for command,
type “n” to create a new partition, when it asks for partition type, type “p” (primary) choose 1 as
partition number, 1 as fist cylinder and 953 as last cylinder. Now create the second primary partition
“n”, “p”, “2”, type 954 as first cylinder and 1017 as last cylinder.
It’s needed too to change the type of the partition 2: type “t”, “2”, “82” as hex code (Linux swap).
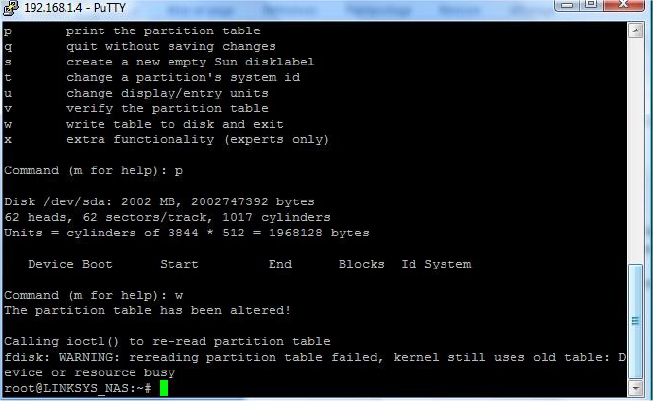
Type “p” as command to list partitions and see if it’s correct, if yes don’t forget to write the new
partition table: type “w” as command.
See picture below for an illustrated partitions creation:

5/ Format the new partitions:
First type “umount /dev/sda1
To format partition 1, type “mkfs.ext3 /dev/sda1”.
To format swap partition 2, type “mkswap /dev/sda2”.
6/ Move the root filesystem to the USB stick:
Type “swapon /dev/sda2”, this tells the system to use swap partition if it needs during transfer.
Type “turnup memstick -i /dev/sda1 -t ext3”, and wait till the files are copied (about 5 minutes).
Reboot the NAS, re-open a Putty session.
Now we need to correct the fstab file, type “vi /etc/fstab”
Type “i” to enter in insert mode and modify the file so it looks exactly like this:
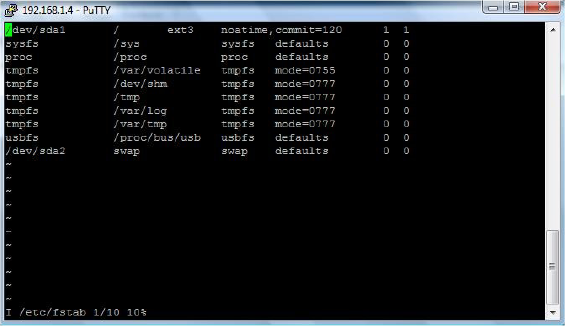
When changes are done press “esc” to quit vi’s insert mode, type “:w” to save the file then “:q” to
quit vi.
Review the file by typing “cat /etc/fstab” to see if all is correct.
Reboot the NAS, re-open a Putty session.
7/ Install the Standard Package Set:
First, we need to ensure the NAS can reach the internet, type “ping -c 4 www.nslu2-linux.org”.
If you have 0% packet loss then it’s OK you can continue, if not check your NAS IP settings with
“turnup init”, “turnup preserve” then reboot.
Type “opkg update”
Type “opkg install tzdata”
Type “opkg -force-overwrite install joe nano \ (Yes, hit “Enter” after the backslash on the )
bash file gawk util-linux procps coreutils” ( command line, it allow you to build )
( commands that can be multi-line )
Wait until it finished the install, reboot the NAS, and wait until it beeps 3 times, then open a new Putty session.
8/ Connecting the External USB HDD:
You have to connect your USB HDD to NSLU-2 “disk 2” port. Additional powering with a poweradaptor
may be needed.
We now need to know what will be you USB HDD device, so first connect (if not done) your HDD to
NSLU-2 USB port 2.
Once logged type:
“ls /media”, you'll see a list of device, try to determine what your USB HDD could be:
for example “ls /media/sdb1”, if it list your USB HDD content then it's the good path.
You can also use USB Thumb drive, but the goal is to use a wide USB HDD.
I will take /media/sda1 as example for Samba share.
9/ Install the Samba server:
Now the most important stuff: our SMB server,
Type “opkg install samba”, be patient while installing.
Type “cp /etc/samba/smb.conf /etc/samba/smb.conf.old”, this will keep a copy of the original samba
configuration file.
Type “rm /etc/samba/smb.conf” to delete the original.
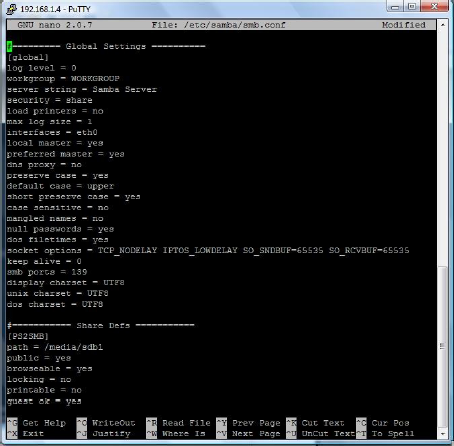
Type “nano /etc/samba/smb.conf”, edit it like below (the separators are commented with “#”, and
can be simply ommitted):
Quit nano and save the file, then restart the samba server:
Type “/etc/init.d/samba restart”
Once done have the following test to see if Samba server is properly configured:
Type “smbclient //LINKSYS_NAS/PS2SMB -N”, you should be prompted with “smb: \>”, then type “ls”
to list the share, so it should list the USB HDD root. Type “exit” to quit smbclient.
You can also check that IE access it, type “\\LINKSYS_NAS\PS2SMB” in IE address bar and it should
show you USB HDD content.

If there’s a problem, check your Samba configuration file edited above. To help you locate errors in it
you can type “testparm -s”.
10/ Final step, reconfigure IP settings for use the NAS directly attached to the PS2:
Type “turnup init”, keep your password (you need to retype it), use “192.168.0.4” as IP address and
“192.168.0.1” as IP gateway and first DNS server (illustrated by the pic on next page).
Type “turnup preserve” to save change, then type “reboot”, you can close the Putty window.
You now need to configure Open PS2 Loader accordingly to this, for PS2 setting use these:
- IP: 192.168.0.10
- Mask: 255.255.255.0
- Gateway: 192.168.0.1
- IP: 192.168.0.4
- Port: 139
- Share: PS2SMB
I strongly recommend you the de-underclock your NAS (133Mhz when the proc is 266Mhz), I
personally have used the nail-clipper option without problem:
http://www.nslu2-linux.org/wiki/HowTo/OverClockTheSlug